The Bellows


Picture Here is one of my double acting bellows that I made to provide the air blast for my forge. I have found that the double acting bellows provides the most controllable air for the forge. This wide amount of air regulation is required when going from large to small pieces and is especially handy when forge welding.
I have actually made two of these bellows. The first one was made entirely from plywood. This one uses tongue and groove oak (6 inches wide) for the top board (leaf) and tongue and groove pine for the bottom board. The rest is plywood. I covered the lungs of both with canvas. Leather would be to expensive and requires considerable care to keep from cracking and keeping the mice away.
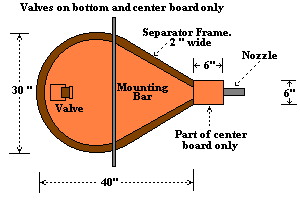
The bellows consists of a bottom board, lower separator frame, a center board, upper separator frame and a top board. I made all of these out of 3/4" plywood or tonge and groove.Only the bottom and center boards contain an air valve. This drawing shows the dimensions of the bellows I have made. All of the parts have the same dimensions except as noted. Only the center board should be extended out 6 X 6" as shown. The separators follow the outer contour and are 2" wide. Install a 3/4" iron bar at the balance point of the center board for mounting the bellows. Picture

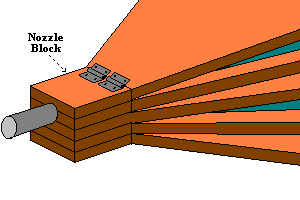
Picture This drawing shows how the five parts are assembled. The top board, upper separator,lower separator and bottom board are hinged to the nozzle block. The nozzle block is made up of 6 X 6 X 3/4" sections screwed together and to the center board extension. The air nozzle is 11/2" conduit and and should go in the center of the upper separator and one half way through the upper and center boards. The end inside the nozzle block should be flattened as it gets to the upper separator. The nozzle blocks are goughed out to fit the conduit. I apply fireproof caulking around the nozzle.

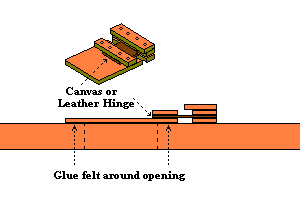
Drawing showing how the air valves are constructed. I use 1/4" paneling for the flap and hold down pieces. The hinge is either leather soaked in linseed oil or canvas. Don't let it be too stiff. This entire valve and its hold downs should rest inside of the separator and not hit the board above it or it will not open. Extend the top of the hold down as shown so the valve doesn't flip all the way over. The felt acts as a gasket. Picture

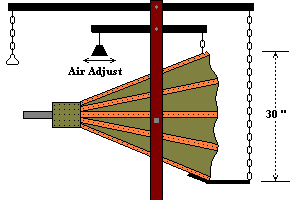
Picture I use a light canvas for the cover (a painter's drop cloth works fine). 1/4" strips with 1" screws are used to hold the canvas to the boards and separators. Cover the nozzle block with canvas where any air will leak. A piece of iron on the bottom board is connected to the pump handle with a chain. A movable weight can be added as shown to regulate the air flow (or put bricks on the top board). I mounted the whole rig between an upright frame of 2X4's. A brace will be required under the nozzle block.